2. Line Quality & Economy - What Is It?
A great deal of the information for this lesson comes from this video by Stan Prokopenko on Youtube.
What is Good Line Quality?
Good lines indicate form with clarity, precision, and beauty. It's like the quote, "art is the most elegant way to get from point A to point B." Good lines help establish what is in front and what is behind, what is round and what is flat, what is connected and what is separated, what is smooth and what is rough, how forms twist and fold, and so on.
What is Line Economy?
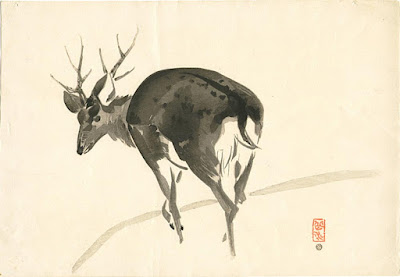
This is the notion that you can describe a great deal with just a few lines - less is more. Each individual line can convey enough information, through gesture, line weight, intensity, etc., so that you can use one line in place of ten to portray your subject. Look at this simple ink brush painting by Gakusui Ide. How many lines do you see, in total?
I count around 28 total, but each line has a job to do - the big sweep of the deer's back is just one thick brush stroke, with a thinner line on top for the ridge of his spine to his tail. None of the lines are hidden or covered or dolled up. There's nothing fussy about the brush strokes. There's an enjoyment you get from seeing it both as a deer and as an ink blotch on paper - the play between abstract and real.
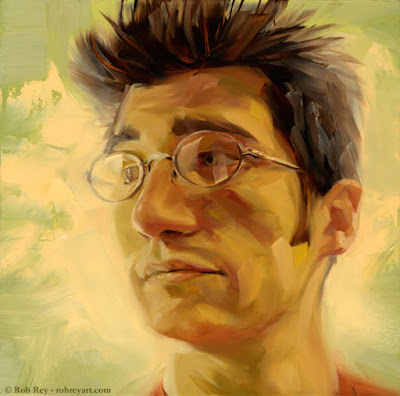
Another great artist for line economy is Rob Rey. Although his works are much more complex, he uses large, sweeping gestural marks to build form, without overly rendering his subjects:
You can see each brush stroke wrap around the forms of his face - it's loose, but also very precise - each stroke serves a purpose. It's a quality in mark making that takes years of applied practice. Good line economy keeps your artwork from looking overworked. As Michael Mentler says, "'Finished', in drawing or painting, usually means that you have succeeded in working it to death." You don't want that.
What to Avoid for Good Line Quality
Beginning art students often draw in one of two ways:
1. Short, Scratchy Lines:
2. Chaotic Searching Lines
These two types of line show timidity and uncertainty. You want your lines to show confidence and grace - like a figure skater gliding across the page.
TIPS TO IMPROVE LINE QUALITY
1. Find a Comfortable Drawing Speed
Some artists draw very quickly, while others draw slowly, there's no right or wrong speed, but get used to one (or more), with daily practice. Note that drawing slow lines can add wobble to them. Faster lines are harder to control, the line might not reach the point you wanted.
Beware of drawing quick, thoughtless scribbles - you shouldn't let your hand move faster than your brain. Give yourself enough time between strokes to visualize the next line before you draw it.
Also note, if your subject is highly complex, you may want to slow down more than usual.
2. Follow Through - Taper Your Lines
Like in sports, when you swing and hit a ball, you continue the swing after the point of contact. In drawing, you continue the motion of your hand as you lift your pencil from the paper. This helps record the energy in the motion of your hand as you draw the line - it gives your lines energy, sweep, and gesture.
This is most important in your initial sketch, where you'll be using your wrist, or your whole arm, and not at the end, when you're mostly drawing with your fingers, for fine details.
3. Ghost Your Lines
You can practice the motion of drawing a line without drawing it - your pencil hovers over the paper. Practice the motion first - repeatedly, at the same speed and position you'd normally draw, and then draw the line, and see if this practice helps you control the line better. As you get used to this, you can start tapering the start of your line, not just its end.
4. Rotate the Paper
Your hand can only make so many motions from one angle. Pulling a pencil is generally much easier than pushing it against the paper. Drawing down is also easier than drawing up. To add variety and get the right line quality, you can rotate the paper, even flipping it upside down when necessary.
If you're working on a surface that you can't rotate, it helps if you rotate your shoulders.
5. Change Your Grip
There is more than one way to hold a drawing pencil. There's the traditional Tripod Grip, which we use when writing:
But, then there's also the Overhand Grip that is useful for drawing larger lines, working bigger, where you use your entire arm to move the pencil, not just your wrist:
6. Try Using Simple C, S, and I, Lines
There is a lesson devoted to this later in this course, when we get to learning about shapes.
7. Bold versus Fine Lines
David Apatoff says, "In my youth, I was easily impressed by fine, detailed linework. Fine lines are a great way for artists to show off. They also feel cool to draw. . . As I matured, I noticed that the better artists exercised greater restraint and often employed heavier, bolder lines for emphasis. These stronger lines are like adding a lower note to the harmony.
"Once in a while there are very special artists who go even further. Working exclusively with a thick line they somehow manage to create sensitive drawings as descriptive as anything done by the fine line crowd. Here is the brilliant work of Noel Sickles:
"When you draw with lots of fine lines, no single line is crucial; if you make a mistake, you can cover it up with cross hatching, or reinforce it with the lines on either side of it. But there is no place for Sickles to hide an imperfect line in these drawings."
LEVEL 1 ASSIGNMENT - Page Skating
THE SET UP: a pencil and a blank piece of paper.
In this exercise, you will draw abstract curving shapes, building them up with simple, elegant tapered curving lines. Use an overhand grip, keeping your hand relaxed - don't squeeze the pencil. Use your whole arm, not too slow or too fast. Think "figure skater". Try to connect and enclose these shapes so seamlessly, that no one can see where you started and ended each shape. Fill the page.
The reason for this exercise is you're building muscle memory, so that it will be easier to draw these elegant lines in future drawings.
LEVEL 1 ASSIGNMENT - Light, Medium, & Dark Lines
THE SET UP: a pencil (HB - 2B) and a blank piece of paper.
Here, you simply draw a series of tapered lines in groupings - light, medium, and dark. You don't have to draw anything real, so there's no fear of making mistakes. Just practice different amounts of pressure on the pencil. Try drawing the lightest lines you possibly can. Fill the page.
This lesson helps you become more versatile with your line making - a pencil is not simply on and off like a digital device, it's analog.
LEVEL 1 ASSIGNMENT - Straight, Tapered Lines
THE SET UP: a pencil and a blank piece of paper.
In this exercise, you fill the page with straight lines, tapering the ends - without using a ruler. It's important to know how to draw straight lines without a ruler.
LEVEL 2 ASSIGNMENT - Trace the Ruler
THE SET UP: a pencil, a ruler, and a blank piece of paper.
In this exercise, you draw a line with a ruler - anywhere on the page. Then, you try to freehand trace over the line without the ruler, as best as you can - 10 times, directly over that line. You will find it becomes easier with practice. Now, use the ruler to make another line, and trace over that, 10x. Keep doing this until you fill the page. Use your whole arm to keep your lines straight, and alternate drawing lines left to right, right to left, down up, and up down.
This exercise will improve your accuracy.
LEVEL 2 ASSIGNMENT - Connect the Dots
THE SET UP: a pencil and a blank piece of paper.
In this exercise, you draw two points randomly, anywhere on your page and then try to draw a single straight line to connect them (No tapering). Try to finish the line directly on the second dot. If you miss the second dot, try again until you hit it.
Hint: It helps if you practice ghosting the line first
Keep drawing more dots and connecting them until you fill the page. The farther apart the dots are, the more of a challenge this will be.
LEVEL 2 ASSIGNMENT - Connect the Dots - Light, Medium, & Dark
THE SET UP: a pencil and a blank piece of paper.
In this exercise, you repeat the last exercise, only now you will be practicing with different amounts of pressure on your pencil. Some dots you'll connect with light lines, some with medium, and some with dark lines. Good luck!


Comments
Post a Comment